Thursday, June 13, 2024


The DevOps Pipeline (lab 7)- Week 1 Final Project

Introduction

In this hands-on lab, you will create a DevOps pipeline all the way from making a code change to deploying that change to a production environment. One of the great benefits of DevOps comes from its focus on automated pipelines, and here you will have the opportunity to try one out so you can see it in action from a hands-on perspective. After completing this hands-on lab, you should have a basic idea of what it is like to use a DevOps pipeline to change the code and get those changes into production. You'll first need to have a GitHub account and you'll fork the provided repo to your own GitHub account. This way, we have our own version of the files we can make changes to.


1.     Fork the GitHub repo.

Uncheck the box next to Copy the master branch only

Note: If you forget to uncheck the box, not all of the forks will copy over to your new repo and you won't be able to complete the lab.


2.     After forking, click on branch, and you would see 4 branches listed.


Execute the Initial Deployment

Set Up a Continuous Integration Server

Copy the Public IP address of the CI server provided in the lab credentials, and paste it into a new browser tab with :8080 appended to the end.

We'll land at a Jenkins installation. Click the listed devops-essentials-sample.

In the left-hand menu, click Configure.

Click the Branch Sources tab.

Navigate to the forked repo that you created in GitHub and copy the URL to your clipboard.

Navigate to Jenkins, and change the Project Repository to the copied URL of the fork you created in GitHub.

Note: Notice the username changes, but the URL address is the same.


Create a Pull Request

Navigate to the lab credentials section, copy the Public IP address of production webserver, and paste it into a new browser tab.

Note: You should see the following message: DevOps is great!

Navigate back to GitHub and click 4 branches.

Locate the new-feature branch, and click New pull request.

Set the base repository dropdown to your personal fork.

Set the base dropdown to the master branch.

Make sure the compare dropdown is set to new-feature.

If you scroll down, you will see the changes are displayed in a code comparison. Once ready, select Create pull request.

Select Merge pull request, and then Confirm merge.

Navigate to the Jenkins server tab, at the top of the page click the Jenkins breadcrumb link to get back to the main Jenkins page.

Click devops-essentials-sample to view the branches.

Click master.

In the left-hand menu, select Build Now.

When your build gets to the DeployToProd stage, it will pause and wait for our input to complete. Before we continue, we first want to check out how the web app looks in the staging environment.

Navigate to the lab credentials section, copy the Public IP address of staging webserver, and paste it into a new browser tab.

Note: If the changes have been properly deployed to the staging server, you should see the following message: DevOps is awesome!

Now that we've confirmed our app change looks ok in the staging environment, we can push it to production.

Back in the Jenkins > devops-essentials-sample > master page, hover over the DeployToProd section for a pop-up window to appear with the following message: Does the staging environment look OK?


Select Proceed.


Return to your browser and navigate to the production webserver tab with the original message:DevOps is great!


Refresh the page to see the updated text: DevOps is awesome!


Click Save.

Note: Jenkins will automatically start scanning and building the branches from the fork.


Run the "Broken" Deployment


Navigate back to GitHub and click 4 branches.

Note: On top of the page, click the root of the forked project: devops-essentials-sample-app to get back to the main page.

Locate the broken-feature branch, and click New pull request.

Set the base repository dropdown to your personal fork.

Set the base dropdown to the master branch.

Make sure the compare dropdown is set to broken-feature.

Note: Scroll down the page, and notice the spelling error.

Click Create pull request.

Click Merge pull request.

Click Confirm merge.

Navigate back in the Jenkins tab, and in the left-hand menu, select Build Now.

Once it gets to the DeployToProd stage, hover over the DeployToProd section for a pop-up window to appear with the following message: Does the staging environment look OK?

Select Proceed.

Navigate to the production webserver tab and refresh the page to see the spelling error.


Roll Back the Broken Deployment


Navigate back to the Jenkins page, and in the left-hand menu, click on build #2.

Click Replay.

Click Run.

While that is building, navigate to the staging webserver tab, and refresh the page to view the correct text.

Navigate to back to Jenkins, hover over the DeployToProd section, and select Proceed.

Once the update is complete, navigate to the production webserver tab to view the correct text again, meaning we have performed a successful rollback.

 Creating & Building a Jenkins Pipeline Job

Ø Executing Jenkins Pipeline From Github (Jenkinsfile)-lab 6

In this exercise, you will build a simple pipeline for a sample application. You will gain a basic familiarity with how a Jenkins Pipeline is created and how to implement simple build logic within a pipeline.

The Scenario

Your team is building a java app. You have been asked to build a Jenkins Pipeline app. The pipeline project needs to build the code, run the automated tests, and deploy  artifact that is created by the build.

Follow the steps given below to create and build our pipeline.

SETUP YOUR CODE REPO AND JENKINS

Ø  First, we need to go to this code and fork the:

      https://github.com/mf210/django_demoapp_devops


In the last section, we used the pipeline script directly on Jenkins. In this section, we will look at how to execute a pipeline script available in an SCM system like Github.


Before we can test this in Jenkins, we need to get an API key from GitHub so Jenkins can pull down this source code from GitHub. To do this:

v  Click your avatar in the top right corner

v  Click Settings.

v  Click Developer settings.

v  Click Personal access tokens > Tokens (classic).

v  Click Generate new token > Generate new token (classic).

v  Note: jenkins.

v  Check the box next to admin:repo_hook.

v  Generate token.

v  Copy the generated token to the clipboard.

Lets Build the Pipeline in Jenkins


·         In Jenkins, click New Item.

·         For the item name, type my_first_pipeline, and select Multibranch Pipeline. Click OK.

·         Under Branch Sources, click Add source, and select Git.

·         Under Credentials, click Add, and select Jenkins.

·         Username: Enter your GitHub username.

·         Password: Paste in the API key you copied before.

·         ID: github_key

·         Description: GitHub key

·         Click Add.

In the new Git section under Branch Sources, click the Credentials dropdown and select the credential you just created. For Project Repository, copy and paste in the URL of your personal fork of the source code repository. Click Save.


The initial build will take several minutes to complete.


Wednesday, June 12, 2024


CANARY DEPLOYMENTS WITH KUBERNETES AND JENKINS

Today we'll look at canary deployments with Kubernetes. Your team is building an application, but there were some recent deployments that introduced bugs. They tested and tested and tried to ensure that no bugs, but unfortunately anytime they deploy the application they still have some bugs.

Now we want to mitigate these kinds of issues, therefore the team has requested you to develop a Canary deployment. That means that when we want to deploy new code, we will actually release that code into production to a portion of our user base, so it will not be used by everyone, but a certain percentage of people will be using the new code even if they are unaware of it, and once we verify that everything is up and running and everything looks good with that code, we will proceed to roll it out to the entire population. Our application is presently running on a Kubernetes cluster, and the team is using a Jenkins pipeline to execute continuous integration and deployments, thus we will need to add lo`gic to this existing pipeline to accomplish the Canary deployment.

SETUP YOUR CODE REPO AND JENKINS

Ø  First, we need to go to this code and fork the repo: https://github.com/ACloudGuru-Resources/cicd-pipeline-train-schedule-canary.

Ø  After creating your personal fork, edit the Jenkinsfile and put in your DockerHub username.

Ø  Log Into our Jenkins Server


SET UP OUR JENKINS CREDENTIALS

Select Manage Jenkins > Credentials from the menu.

From the single credential present, click on global, then Add Credentials.

Enter your personal GitHub user name in the Username section.

Copy your Github token, and back in Jenkins, paste the token into the Password field.

Set the ID to github_key and the Description to GitHub Key.

Click Create.


ADD DOCKER HUB CREDENTIALS

Click + Add Credentials.

Provide your Docker Hub username and password in the corresponding fields.

Set the ID to docker_hub_login and the Description to Docker Hub.

Click Create.


ADD KUBERNETES CREDENTIALS

Click + Add Credentials.

Set the Kind to Kubernetes configuration (kubeconfig)

Set the ID to kubeconfig and the description to Kubeconfig.

SSH into the Cloud Server Kubernetes Master host.

Run the following:

ssh cloud_user@

cat ~/.kube/config

Copy the contents of the file that appears.

Back in our Jenkins browser, paste what was copied into the Enter directly > Content section.

Click Create.


SET UP THE PROJECT

Go back to the main page by selecting the Jenkins icon at the top left of the website.

Click New Item.

Give the item the name

Select Multibranch Pipeline and click OK.

Under Branch Sources, change the Add source to GitHub.

Set up the page as follows:

Credentials: Option that ends in (GitHub Key)

Repository HTTPS URL: your github repository

Select Save.

BUILD THE JOB IN JENKINS

Click on our Kubernetes server, and enter the following to review our deployment:

kubectl get pods

launch the application with Kubernetes master ip address and port 8080


ADD A CANARY STAGE TO THE PIPELINE

To complete this, you will need to do the following:

Go back to GitHub and go to the fork that we made.

Copy the train-schedule-kube-canary.yml code.

Click Add file > Create new file.

Name the file train-schedule-kube-canary.yml.

Paste in the train-schedule-kube-canary.yml code.

Click Commit new file.

Select the Jenkinsfile, which can be found here.

Add a new stage after the Push Docker Image stage and before DeployToProduction


kind: Service
apiVersion: v1
metadata:
  name: train-schedule-service-canary
spec:
  type: NodePort
  selector:
    app: train-schedule
    track: canary
  ports:
  - protocol: TCP
    port: 8080
    nodePort: 8081

---

apiVersion: apps/v1
kind: Deployment
metadata:
  name: train-schedule-deployment-canary
  labels:
    app: train-schedule
spec:
  replicas: $CANARY_REPLICAS
  selector:
    matchLabels:
      app: train-schedule
      track: canary
  template:
    metadata:
      labels:
        app: train-schedule
        track: canary
    spec:
      containers:
      - name: train-schedule
        image: $DOCKER_IMAGE_NAME:$BUILD_NUMBER
        ports:
        - containerPort: 8080
        livenessProbe:
          httpGet:
            path: /
            port: 8080
          initialDelaySeconds: 15
          timeoutSeconds: 1
          periodSeconds: 10
        resources:
          requests:
            cpu: 200m
Jenkinsfile

pipeline {
    agent any
    environment {
        //be sure to replace "willbla" with your own Docker Hub username
        DOCKER_IMAGE_NAME = "willbla/train-schedule"
    }
    stages {
        stage('Build') {
            steps {
                echo 'Running build automation'
                sh './gradlew build --no-daemon'
                archiveArtifacts artifacts: 'dist/trainSchedule.zip'
            }
        }
        stage('Build Docker Image') {
            when {
                branch 'master'
            }
            steps {
                script {
                    app = docker.build(DOCKER_IMAGE_NAME)
                    app.inside {
                        sh 'echo Hello, World!'
                    }
                }
            }
        }
        stage('Push Docker Image') {
            when {
                branch 'master'
            }
            steps {
                script {
                    docker.withRegistry('https://registry.hub.docker.com', 'docker_hub_login') {
                        app.push("${env.BUILD_NUMBER}")
                        app.push("latest")
                    }
                }
            }
        }
        stage('CanaryDeploy') {
            when {
                branch 'master'
            }
            environment { 
                CANARY_REPLICAS = 1
            }
            steps {
                kubernetesDeploy(
                    kubeconfigId: 'kubeconfig',
                    configs: 'train-schedule-kube-canary.yml',
                    enableConfigSubstitution: true
                )
            }
        }
        stage('DeployToProduction') {
            when {
                branch 'master'
            }
            environment { 
                CANARY_REPLICAS = 0
            }
            steps {
                input 'Deploy to Production?'
                milestone(1)
                kubernetesDeploy(
                    kubeconfigId: 'kubeconfig',
                    configs: 'train-schedule-kube-canary.yml',
                    enableConfigSubstitution: true
                )
                kubernetesDeploy(
                    kubeconfigId: 'kubeconfig',
                    configs: 'train-schedule-kube.yml',
                    enableConfigSubstitution: true
                )
            }
        }
    }
}

RUN A SUCCESSFUL DEPLOYMENT

Check on our website that everything is working by putting in the Public IP address for our Kubernetes with port :8081 at the end.

Once we know the site is working, go back to Jenkins, hover over DeployToProduction, and click Proceed.

On our Kubernetes server,we see the new node running

Monday, June 10, 2024


Kubernetes Persistent Volume (PV) is a storage resource in a Kubernetes cluster that has been provisioned by an administrator or dynamically provisioned using Storage Classes. Persistent Volumes are designed to provide a more straightforward and efficient way to manage storage resources in a cloud-native environment. Here’s an overview of the key characteristics and functionality of Persistent Volumes in Kubernetes:

How It Works

  • Persistent Volume Claims (PVCs): To use a Persistent Volume, a user must create a Persistent Volume Claim, which specifies the size and access modes (such as ReadWriteOnce, ReadOnlyMany, ReadWriteMany) among other settings. This claim acts as a request for storage, which can then be bound to a suitable Persistent Volume in the cluster.
  • Binding: Once a PVC is made, it is bound to an available and compatible Persistent Volume. This binding is exclusive, depending on the access modes specified, meaning that a PV can only be bound to one PVC at a time, and vice versa.
  • Using the PV: Pods can then use the PVC as a volume. The actual Persistent Volume behind the claim is transparent to the pod, providing a simple and consistent method to connect pods to the storage resources they require.

Persistent Volume Explained

Imagine you're renting an apartment (a pod in Kubernetes) where you can live and store your belongings (data). Normally, when you move out (when the pod is deleted), you'd have to take all your belongings with you, and if you move back in, you'd need to bring everything back or acquire them anew.

In the world of Kubernetes, a Persistent Volume (PV) is like a storage unit separate from your apartment. Even if you move out of your apartment, whatever you keep in that storage unit stays there, undisturbed, until you decide to come back or someone else rents it. This storage unit is not tied to any specific apartment; it's a space where you can securely store things long-term, no matter how often you move or change apartments.

When you first move in, you claim one of these storage units (this is akin to creating a Persistent Volume Claim (PVC) in Kubernetes). This claim is like telling the storage facility, "I need a unit of this size and these access conditions." The facility then finds a unit that fits your needs and reserves it for you (this is the binding process between PVC and PV).

So, in simple terms:

  • A Persistent Volume is like a rented storage unit for your data, separate from your living space but within the same facility, which you can use as long as you need, independent of where you live.
  • This setup ensures that your data—like furniture and personal belongings—is safely stored even if you switch apartments, providing continuity and ease of access whenever you need it.

Create a YAML file for the Persistent Volume Claim

vi pv.yaml


apiVersion: v1
kind: PersistentVolume
metadata:
  name: my-pv
spec:
  capacity:
    storage: 1Gi
  accessModes:
    - ReadWriteOnce
  persistentVolumeReclaimPolicy: Retain
  hostPath:
    path: "/mnt/data"

After creating the Persistent Volume, you can create a Persistent Volume Claim (PVC) to use this storage in your pods.

Apply the Configuration

kubectl apply -f pv.yaml


Create a Persistent Volume Claim (PVC) in the dev Namespace

Create a YAML file for the Persistent Volume Claim

vi pvc.yaml

To ensure your data persists even if the pod is deleted or replaced, you need to create a Persistent Volume (PV) and a Persistent Volume Claim (PVC). Below is the YAML configuration to create a Persistent Volume:


apiVersion: v1
kind: PersistentVolumeClaim
metadata:
  name: my-pvc
  namespace: dev
spec:
  accessModes:
    - ReadWriteOnce
  resources:
    requests:
      storage: 1Gi

Use the PVC in a Pod within the dev Namespace

Create a YAML file for the Pod vi pod.yaml

apiVersion: v1
kind: Pod
metadata:
  name: my-pod
  namespace: dev
spec:
  containers:
    - name: my-container
      image: nginx
      volumeMounts:
        - mountPath: "/usr/share/nginx/html"
          name: my-storage
  volumes:
    - name: my-storage
      persistentVolumeClaim:
        claimName: my-pvc

kubectl apply -f pod.yaml


List pods

kubectl get pods -n dev


describe my-pod to see PV

kubectl describe pod my-pod -n dev

Kubernetes Deployment YAML Example

Here is an example of a Kubernetes deployment YAML file:


apiVersion: apps/v1
kind: Deployment
metadata:
  name: deploy1
  labels:
    app: app-v1
spec:
  replicas: 3
  selector:
    matchLabels:
      app: app-v1
  template:
    metadata:
      labels:
        app: app-v1
    spec:
      affinity:
        nodeAffinity:
          requiredDuringSchedulingIgnoredDuringExecution:
            nodeSelectorTerms:
            - matchExpressions:
              - key: beta.kubernetes.io/arch
                operator: In
                values:
                - amd64
                - arm64
      containers:
      - name: deploy-images
        image: kellyamadin/d-imags:v1
        ports:
        - containerPort: 8080


Launching an EKS Cluster

Understanding Amazon EKS (Elastic Kubernetes Service)

Introduction

Amazon EKS (Elastic Kubernetes Service) is a managed Kubernetes service provided by Amazon Web Services (AWS). It simplifies the process of deploying, managing, and scaling containerized applications using Kubernetes, an open-source system for automating the deployment, scaling, and management of containerized applications. 

Think of an EKS cluster as a managed service that helps you run your applications in containers. Imagine you have a set of apps (like a website, an online store, or a chat service) that need to run smoothly and scale as needed without you worrying about the nitty-gritty details of servers and infrastructure. Amazon EKS (Elastic Kubernetes Service) takes care of that for you.

What is Kubernetes?

Before diving into EKS, it’s helpful to understand Kubernetes:

  • Kubernetes: Think of Kubernetes as a conductor of an orchestra. It manages and orchestrates containers, which are like individual musicians in the orchestra. Each container runs a piece of your application, and Kubernetes ensures that they all work together harmoniously, handling tasks like scaling, load balancing, and recovery from failures.

EKS Cluster : A Modern Office Building

Think of an EKS cluster as a modern office building designed to host various businesses and services. Amazon EKS manages the building, while you focus on running your business efficiently within this well-maintained environment.

The Office Building Setup

  1. The Office Building (EKS Cluster):
    • The EKS cluster is like a modern office building where different businesses (applications) operate. Amazon ensures the building is always in good condition, secure, and well-managed.
  2. Offices (Worker Nodes):
    • Each office within the building is like a worker node. These offices are where your employees (containers) work on tasks. You can have as many offices as you need, depending on the size of your business.
  3. Workstations (Pods):
    • Inside each office, there are workstations where employees do their work. In EKS, the workstations are called pods. A pod contains one or more containers (employees) that perform specific tasks related to your application.
  4. Building Management Team (Kubernetes Control Plane):
    • The building management team oversees the entire office building, ensuring everything runs smoothly. This is similar to the Kubernetes control plane, which manages the worker nodes and pods, ensuring your applications are running properly.


Elastic Kubernetes Service (EKS) is a fully managed Kubernetes service from AWS. In this class, you will work with the AWS command line interface and console, using command line utilities like eksctl and kubectl to launch an EKS cluster, provision a Kubernetes deployment and pod running instances of nginx, and create a LoadBalancer service to expose your application over the internet.


OBJECTIVES

Successfully complete this lab by achieving the following learning objectives:


Create an IAM User with Admin Permissions

Launch an EC2 Instance and Configure the Command Line Tools

Provision an EKS Cluster

Create a Deployment on Your EKS Cluster

Test the High Availability Features of Your EKS Cluster


Create an IAM User with Admin Permissions

Navigate to IAM > Users.

Click Add users.

In the User name field, enter k8-admin.

Click Next.

Select Attach policies directly.

Select AdministratorAccess.

Click Next.

Click Create user.

Select the newly created user k8-admin.

Select the Security credentials tab.

Scroll down to Access keys and select Create access key.

Select Command Line Interface (CLI) and checkmark the acknowledgment at the bottom of the page.

Click Next.

Launch EC2 with Amazon Linux 2 AMI attached an Administrator Access

COMMANDS TO INSTALL EKS

prep the sytem:  

sudo yum update -y

sudo yum install -y curl unzip tar


Install AWS CLI v2

curl "https://awscli.amazonaws.com/awscli-exe-linux-x86_64.zip" -o "awscliv2.zip"

unzip -q awscliv2.zip

sudo ./aws/install --update

aws --version


   aws configure

aws sts get-caller-identity


ENTER: Your Region Eg(us-east-1) Format: json


Install eksctl

curl -sSLO "https://github.com/eksctl-io/eksctl/releases/latest/download/eksctl_Linux_amd64.tar.gz"

tar -xzf eksctl_Linux_amd64.tar.gz -C /tmp

sudo mv /tmp/eksctl /usr/local/bin/

eksctl version


Install kubectl

curl -LO "https://dl.k8s.io/release/v1.29.6/bin/linux/amd64/kubectl"

chmod +x kubectl

sudo mv kubectl /usr/local/bin/

file /usr/local/bin/kubectl   

kubectl version --client


Cluster creation

Provision an EKS Cluster

Provision an EKS cluster with three worker nodes in us-east-2:

eksctl create cluster \

  --name EKSDemo001 \

  --region us-east-2 \

  --version 1.29 \

  --nodegroup-name standard-workers \

  --node-type t3.medium \

  --nodes 2 \

  --nodes-min 1 \

  --nodes-max 2 \

  --managed


It will take 10–15 minutes since it's provisioning the control plane and worker nodes, attaching the worker nodes to the control plane, and creating the VPC, security group, and Auto Scaling group.

In the AWS Management Console, navigate to CloudFormation and take a look at what’s going on there.

Select the eksctl-dev-cluster stack (this is our control plane).

Click Events, so you can see all the resources that are being created.

We should then see another new stack being created — this one is our node group.

Once both stacks are complete, navigate to Elastic Kubernetes Service > Clusters.

Click the listed cluster.

Delete the cluster

eksctl delete cluster --region us-east-2  --name EKSDemo001 (AFTER LAB)


Validate the cluster by the follow command 

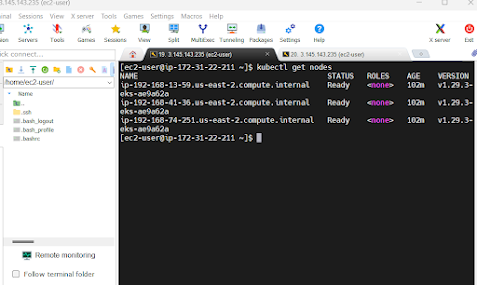
kubectl get nodes


let's try to deploy Application on the cluster using deployment and service yaml file 

The command to create deployment and service 


vi DemoApp01.yml and copy and paste the below 

Kubernetes Deployment YAML 

Here is an example of a Kubernetes deployment YAML file:


apiVersion: apps/v1
kind: Deployment
metadata:
  name: deploy1
  labels:
    app: app-v1
spec:
  replicas: 3
  selector:
    matchLabels:
      app: app-v1
  template:
    metadata:
      labels:
        app: app-v1
    spec:
      affinity:
        nodeAffinity:
          requiredDuringSchedulingIgnoredDuringExecution:
            nodeSelectorTerms:
            - matchExpressions:
              - key: beta.kubernetes.io/arch
                operator: In
                values:
                - amd64
                - arm64
      containers:
      - name: deploy-images
        image: princex/bluegreen:v1
        ports:
        - containerPort: 8080

Save the file :wq

kubectl create -f DemoApp01.yml 


Create service file by below command

Kubernetes Service YAML Example

Here is an example of a Kubernetes service YAML file:

vi ServiceApp01.yml


apiVersion: v1
kind: Service
metadata:
  name: svc1
  labels:
    app: app-v1
spec:
  ports:
  - port: 8080
    nodePort: 32000
    protocol: TCP
  selector:
    app: app-v1
  type: NodePort


kubectl create -f ServiceApp01.yml


copy the public cluster ip and with the port being expose in the SG(32000) and paste in the browse 


Rollout and Rollback on Kubernetes by using the below command

 Rolling Out and Rolling Back Deployments in Kubernetes

Kubernetes makes it easy to manage the lifecycle of your applications with its deployment resources. Two important operations you can perform with deployments are rolling out new versions of your application and rolling back to previous versions if something goes wrong.

Rolling Out a Deployment

Rolling out a deployment means updating your application to a new version. Kubernetes handles this process seamlessly, ensuring minimal disruption to the service. Here’s how it works:

Create or Update the Deployment:

  1. You define your application's desired state in a YAML file, specifying the container image and other settings. When you update this file with a new image version, Kubernetes automatically starts the rollout process.

·  Rolling Update Strategy:

  1. By default, Kubernetes uses a rolling update strategy. It gradually replaces the old pods with new ones, ensuring that some instances of the old version remain running until the new version is successfully deployed. This way, your application remains available during the update.

First open the deployment file and change the version of the image to your desire one and execute the below


vi DemoApp01.yml 

Change image version from v1 to v2

kubectl apply -f DemoApp01.yml --record


kubectl rollout status deployment deploy1


Rollback Command

kubectl rollout undo deployment deploy1 --to-revision=1


Blue/Green Deployment in Kubernetes

Blue-Green Deployment is a technique that reduces downtime and risk by running two identical production environments, only one of which (let's say "Blue") serves live production traffic. The other ("Green") is where you deploy the new version of your application. Once the new version is ready and tested in the Green environment, traffic is switched from Blue to Green.

Steps for Blue-Green Deployment

  1. Set Up Two Environments:
    • Create two identical environments, Blue and Green. Initially, Blue is the live environment serving user traffic, and Green is idle.
  2. Deploy to Green:
    • Deploy the new version of your application to the Green environment. Perform tests to ensure the new version works as expected.
  3. Switch Traffic:
    • Once the Green environment is confirmed to be working correctly, switch the production traffic from Blue to Green. This switch is usually handled by updating the DNS or load balancer settings.
I advice you delete previous depoyment and service files before staring this lab


List your deployments

kubectl get deployments 

Delete your deployments

kubectl delete deployment deploy1


List your service

kubectl get service

Delete your service

kubectl delete service svc1


 Intial Setup: Blue Environment

Create the Blue deployment and service files

vi DemoApp01.yml and copy and paste the below 


apiVersion: apps/v1
kind: Deployment
metadata:
  name: deploy1
  labels:
    app: app-v1
spec:
  replicas: 3
  selector:
    matchLabels:
      app: app-v1
  template:
    metadata:
      labels:
        app: app-v1
    spec:
      affinity:
        nodeAffinity:
          requiredDuringSchedulingIgnoredDuringExecution:
            nodeSelectorTerms:
            - matchExpressions:
              - key: beta.kubernetes.io/arch
                operator: In
                values:
                - amd64
                - arm64
      containers:
      - name: deploy-images
        image: princex/bluegreen:v1
        ports:
        - containerPort: 8080

kubectl create -f DemoApp01.yml 

kubectl apply -f DemoApp01.yml  


vi ServiceApp01.yml


apiVersion: v1
kind: Service
metadata:
  name: svc1
  labels:
    app: app-v1
spec:
  ports:
  - port: 8080
    nodePort: 32000
    protocol: TCP
  selector:
    app: app-v1
  type: NodePort

kubectl create -f filename (ServiceApp01.yml)

kubectl create -f ServiceApp01.yml

kubectl apply -f ServiceApp01.yml


Create the Green

deployment file:

vi DemoApp02.yml


apiVersion: apps/v1
kind: Deployment
metadata:
  name: deploy2
  labels:
    app: app-v2
spec:
  replicas: 3
  selector:
    matchLabels:
      app: app-v2
  template:
    metadata:
      labels:
        app: app-v2
    spec:
      affinity:
        nodeAffinity:
          requiredDuringSchedulingIgnoredDuringExecution:
            nodeSelectorTerms:
            - matchExpressions:
              - key: beta.kubernetes.io/arch
                operator: In
                values:
                - amd64
                - arm64
      containers:
      - name: deploy-images
        image: princex/bluegreen:v2
        ports:
        - containerPort: 8080

kubectl create -f  DemoApp02.yml


vi ServiceApp02.yml


apiVersion: v1
kind: Service
metadata:
  name: svc2
  labels:
    app: app-v2
spec:
  ports:
  - port: 8080
    nodePort: 32600
    protocol: TCP
  selector:
    app: app-v2
  type: NodePort

kubectl create -f ServiceApp02.yml


copy the public cluster ip and with the port being expose in the SG(32600) and paste in the browse 


flip the service file ( vi ServiceApp01.yml) and change the app-v1 to app-v2 and apply the below 

kubectl apply -f ServiceApp01.yml


  PROMETHEUS AND GRAFANA A robust performance monitoring and alerting stack is crucial to service reliability. Cloud Native Computing Foun...