Launching an EKS Cluster
Understanding Amazon EKS (Elastic
Kubernetes Service)
Introduction
Amazon EKS (Elastic Kubernetes Service) is a managed Kubernetes service provided by Amazon Web Services (AWS). It simplifies the process of deploying, managing, and scaling containerized applications using Kubernetes, an open-source system for automating the deployment, scaling, and management of containerized applications.
Think of an EKS cluster as a managed service that helps you run your applications in containers. Imagine you have a set of apps (like a website, an online store, or a chat service) that need to run smoothly and scale as needed without you worrying about the nitty-gritty details of servers and infrastructure. Amazon EKS (Elastic Kubernetes Service) takes care of that for you.
What
is Kubernetes?
Before diving into EKS, it’s helpful
to understand Kubernetes:
- Kubernetes:
Think of Kubernetes as a conductor of an orchestra. It manages and
orchestrates containers, which are like individual musicians in the
orchestra. Each container runs a piece of your application, and Kubernetes
ensures that they all work together harmoniously, handling tasks like
scaling, load balancing, and recovery from failures.
EKS
Cluster : A Modern Office Building
Think of an EKS cluster as a modern office building designed to host
various businesses and services. Amazon EKS manages the building, while you
focus on running your business efficiently within this well-maintained
environment.
The
Office Building Setup
- The Office Building (EKS Cluster):
- The EKS
cluster is like a modern office building where different businesses
(applications) operate. Amazon ensures the building is always in good
condition, secure, and well-managed.
- Offices (Worker Nodes):
- Each office
within the building is like a worker node. These offices are where your
employees (containers) work on tasks. You can have as many offices as you
need, depending on the size of your business.
- Workstations (Pods):
- Inside each
office, there are workstations where employees do their work. In EKS, the
workstations are called pods. A pod contains one or more containers
(employees) that perform specific tasks related to your application.
- Building Management Team (Kubernetes Control
Plane):
- The building
management team oversees the entire office building, ensuring everything
runs smoothly. This is similar to the Kubernetes control plane, which
manages the worker nodes and pods, ensuring your applications are running
properly.
Elastic Kubernetes Service (EKS) is a fully managed Kubernetes
service from AWS. In this class, you will work with the AWS command line
interface and console, using command line utilities like eksctl and kubectl to
launch an EKS cluster, provision a Kubernetes deployment and pod running
instances of nginx, and create a LoadBalancer service to expose your
application over the internet.
OBJECTIVES
Successfully complete this
lab by achieving the following learning objectives:
Create an IAM User with Admin Permissions
Launch an EC2 Instance and Configure the Command Line Tools
Provision an EKS Cluster
Create a Deployment on Your EKS Cluster
Test the High Availability Features of Your EKS Cluster
Create an IAM User with
Admin Permissions
Navigate to IAM > Users.
Click Add users.
In the User name field, enter k8-admin.
Click Next.
Select Attach policies directly.
Select AdministratorAccess.
Click Next.
Click Create user.
Select the newly created user k8-admin.
Select the Security credentials tab.
Scroll down to Access keys and select Create access key.
Select Command Line Interface (CLI) and checkmark the
acknowledgment at the bottom of the page.
Click Next.
Launch EC2 with Amazon
Linux 2 AMI attached an Administrator Access
COMMANDS TO INSTALL EKS
prep the sytem:
sudo yum update -y
sudo yum install -y curl unzip tar
Install AWS CLI v2
curl "https://awscli.amazonaws.com/awscli-exe-linux-x86_64.zip" -o "awscliv2.zip"
unzip -q awscliv2.zip
sudo ./aws/install --update
aws --version
aws configure
aws sts get-caller-identity
ENTER:
Your Region Eg(us-east-1) Format: json
Install eksctl
curl -sSLO "https://github.com/eksctl-io/eksctl/releases/latest/download/eksctl_Linux_amd64.tar.gz"
tar -xzf eksctl_Linux_amd64.tar.gz -C /tmp
sudo mv /tmp/eksctl /usr/local/bin/
eksctl version
Install
kubectl
curl -LO "https://dl.k8s.io/release/v1.29.6/bin/linux/amd64/kubectl"
chmod +x kubectl
sudo mv kubectl /usr/local/bin/
file /usr/local/bin/kubectl
kubectl version --client
Cluster creation
Provision an EKS Cluster
Provision an EKS cluster with three worker nodes in us-east-2:
eksctl create cluster \
--name EKSDemo001 \
--region us-east-2 \
--version 1.29 \
--nodegroup-name standard-workers \
--node-type t3.medium \
--nodes 2 \
--nodes-min 1 \
--nodes-max 2 \
--managed
It
will take 10–15 minutes since it's provisioning the control plane and worker
nodes, attaching the worker nodes to the control plane, and creating the VPC,
security group, and Auto Scaling group.
In
the AWS Management Console, navigate to CloudFormation and take a look at
what’s going on there.
Select
the eksctl-dev-cluster stack (this is our control plane).
Click
Events, so you can see all the resources that are being created.
We
should then see another new stack being created — this one is our node group.
Once
both stacks are complete, navigate to Elastic Kubernetes Service > Clusters.
Click
the listed cluster.
Delete
the cluster
eksctl
delete cluster --region us-east-2 --name EKSDemo001 (AFTER LAB)
Validate the cluster by the follow command
kubectl get nodes
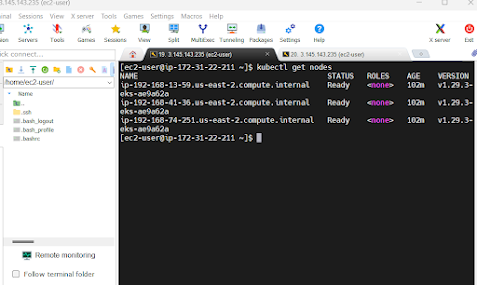
let's
try to deploy Application on the cluster using deployment and service yaml file
The command to create deployment and
service
vi DemoApp01.yml and copy and paste the below
Kubernetes Deployment YAML
Here is an example of a Kubernetes deployment YAML file:
apiVersion: apps/v1
kind: Deployment
metadata:
  name: deploy1
  labels:
    app: app-v1
spec:
  replicas: 3
  selector:
    matchLabels:
      app: app-v1
  template:
    metadata:
      labels:
        app: app-v1
    spec:
      affinity:
        nodeAffinity:
          requiredDuringSchedulingIgnoredDuringExecution:
            nodeSelectorTerms:
            - matchExpressions:
              - key: beta.kubernetes.io/arch
                operator: In
                values:
                - amd64
                - arm64
      containers:
      - name: deploy-images
        image: princex/bluegreen:v1
        ports:
        - containerPort: 8080
Save the file :wq
kubectl create -f DemoApp01.yml
Create service file by below command
Kubernetes Service YAML Example
Here is an example of a Kubernetes service YAML file:
vi ServiceApp01.yml
apiVersion: v1
kind: Service
metadata:
  name: svc1
  labels:
    app: app-v1
spec:
  ports:
  - port: 8080
    nodePort: 32000
    protocol: TCP
  selector:
    app: app-v1
  type: NodePort
kubectl create -f ServiceApp01.yml

copy the public cluster ip and with the port
being expose in the SG(32000) and paste in the browse

Rollout and
Rollback on Kubernetes by using the below command
Rolling Out and Rolling Back Deployments in Kubernetes
Kubernetes makes it easy to manage
the lifecycle of your applications with its deployment resources. Two important
operations you can perform with deployments are rolling out new versions
of your application and rolling back to previous versions if something
goes wrong.
Rolling Out a Deployment
Rolling out a deployment means
updating your application to a new version. Kubernetes handles this process
seamlessly, ensuring minimal disruption to the service. Here’s how it works:
Create
or Update the Deployment:
- You define your application's desired state in a YAML
file, specifying the container image and other settings. When you update
this file with a new image version, Kubernetes automatically starts the
rollout process.
· Rolling Update Strategy:
- By default, Kubernetes uses a rolling update strategy.
It gradually replaces the old pods with new ones, ensuring that some
instances of the old version remain running until the new version is
successfully deployed. This way, your application remains available during
the update.
First open the deployment file and change the version of the image to your desire one and execute
the below
vi DemoApp01.yml
Change image version from v1 to v2
kubectl apply -f DemoApp01.yml --record
kubectl rollout status
deployment deploy1
Rollback Command
kubectl rollout undo deployment deploy1 --to-revision=1
Blue/Green
Deployment in Kubernetes
Blue-Green
Deployment is a technique that reduces
downtime and risk by running two identical production environments, only one of
which (let's say "Blue") serves live production traffic. The other
("Green") is where you deploy the new version of your application.
Once the new version is ready and tested in the Green environment, traffic is
switched from Blue to Green.
Steps for Blue-Green Deployment
- Set Up Two
Environments:
- Create two identical environments, Blue and Green.
Initially, Blue is the live environment serving user traffic, and Green
is idle.
- Deploy to Green:
- Deploy the new version of your application to the
Green environment. Perform tests to ensure the new version works as
expected.
- Switch Traffic:
- Once the Green environment is confirmed to be working correctly, switch the production traffic from Blue to Green. This switch is usually handled by updating the DNS or load balancer settings.
List your deployments
kubectl get deployments
Delete your deployments
kubectl delete deployment deploy1
List your service
kubectl get service
Delete your service
kubectl delete service svc1
Intial Setup: Blue Environment
Create the Blue deployment and service files
vi DemoApp01.yml and copy and paste the below
apiVersion: apps/v1
kind: Deployment
metadata:
  name: deploy1
  labels:
    app: app-v1
spec:
  replicas: 3
  selector:
    matchLabels:
      app: app-v1
  template:
    metadata:
      labels:
        app: app-v1
    spec:
      affinity:
        nodeAffinity:
          requiredDuringSchedulingIgnoredDuringExecution:
            nodeSelectorTerms:
            - matchExpressions:
              - key: beta.kubernetes.io/arch
                operator: In
                values:
                - amd64
                - arm64
      containers:
      - name: deploy-images
        image: princex/bluegreen:v1
        ports:
        - containerPort: 8080
kubectl create -f DemoApp01.yml
kubectl apply -f DemoApp01.yml
vi ServiceApp01.yml
apiVersion: v1
kind: Service
metadata:
  name: svc1
  labels:
    app: app-v1
spec:
  ports:
  - port: 8080
    nodePort: 32000
    protocol: TCP
  selector:
    app: app-v1
  type: NodePort
kubectl create -f filename (ServiceApp01.yml)
kubectl create -f ServiceApp01.yml
kubectl apply -f ServiceApp01.yml
Create the Green
vi DemoApp02.yml
apiVersion: apps/v1
kind: Deployment
metadata:
  name: deploy2
  labels:
    app: app-v2
spec:
  replicas: 3
  selector:
    matchLabels:
      app: app-v2
  template:
    metadata:
      labels:
        app: app-v2
    spec:
      affinity:
        nodeAffinity:
          requiredDuringSchedulingIgnoredDuringExecution:
            nodeSelectorTerms:
            - matchExpressions:
              - key: beta.kubernetes.io/arch
                operator: In
                values:
                - amd64
                - arm64
      containers:
      - name: deploy-images
        image: princex/bluegreen:v2
        ports:
        - containerPort: 8080
kubectl create -f DemoApp02.yml
vi ServiceApp02.yml
apiVersion: v1
kind: Service
metadata:
  name: svc2
  labels:
    app: app-v2
spec:
  ports:
  - port: 8080
    nodePort: 32600
    protocol: TCP
  selector:
    app: app-v2
  type: NodePort
kubectl create -f ServiceApp02.yml

copy the public cluster ip and with the port
being expose in the SG(32600) and paste in the browse

flip the service file ( vi ServiceApp01.yml) and change the app-v1 to app-v2 and apply the below
kubectl
apply -f ServiceApp01.yml


No comments:
Post a Comment