INSTALL JENKINS (lab4)
In this hands-on lab, we will install Java and
Jenkins. Once this is done and the Jenkins instance is up and running, take
some time to look around the interface and ensure you are familiar with all the
menu items and other parts of the interface.
To
install Jenkins on Ubuntu via the command line, you can follow these steps:
Update Package Index
Before installing any new packages, it's a good practice to update the local package index to ensure you have the latest version information.
Run the following command:
To update your system's package list, use the following command:
sudo apt updateInstall Java
J Jenkins requires Java to run. You can install Open JDK using the following command:
Sometimes you can be asked after
the operation a number of CPU utilization is going to be used. Do you want to
continue (Y/N). Type y
Check Java version
java -versionAdd the Jenkins repository key:
Add the Jenkins repository to your sources list:
Update your package index again:
Install
Jenkins:
Start
the Jenkins service:
Enable Jenkins to start at boot
ACCESSING JENKINS PORT
To expose port 8080 on an AWS instance, you
need to configure the security group associated with the instance to allow
inbound traffic on port 8080. Here's how you can do it:
Sign in to the AWS Management Console: Go
to the AWS Management Console and sign in to your account.
Navigate to the EC2 Dashboard: From the
services menu, navigate to the EC2 dashboard.
Select the Instance: Select the EC2
instance to which you want to expose port 8080.
View Security Groups: In the details pane
at the bottom, find the Security groups section and click on the linked
security group name.

Click on Security Group

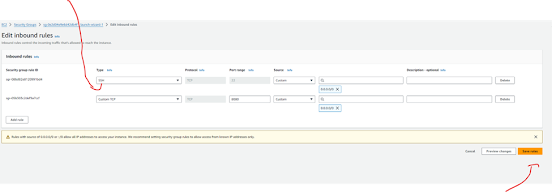
Edit Inbound Rules: In the security group settings, click on the "Inbound rules" tab.

Add
Rule: Click on the "Edit inbound rules" button.
Add
Port 8080: Add a new rule to allow inbound traffic on port 8080. Choose Custom
TCP from the dropdown list, and specify port range 8080.
Save
Rules: Click on the "Save rules" button to apply the changes.
Now, port 8080 should be exposed on your AWS instance, and you should be able to access Jenkins running on that port from outside the instance
Go
to EC2 instance and copy your public IP
address and open a web address with port 8080

Jenkins
Should be up and running

Now we need to go back to our Jenkins
server terminal to access the password for our Jenkins Server
sudo cat /var/lib/jenkins/secrets/initialAdminPassword

Copy the password to Jenkins and lets
access the server
Copy the 32-character alphanumeric password from the terminal and paste it into the Administrator password field, then click Continue.
The next screen presents the option of installing
suggested plugins or selecting specific plugins:

We’ll click the Install suggested plugins option, which will immediately begin the installation process.

When the installation is complete,
you’ll be prompted to set up the first administrative user. Create your
username and password.

You’ll receive an Instance Configuration page that will ask you to confirm the preferred URL for your Jenkins instance. SKIP
You’ll receive a confirmation page confirming that “Jenkins is Ready!”:

Click Start using Jenkins to visit the main Jenkins dashboard:
At this point, you have completed a successful installation of Jenkins.
Conclusion
In this tutorial, you installed Jenkins
using the project-provided packages, started the server, opened the Jenkins
Port, and created an administrative user. At this point, you can start
exploring Jenkins.


No comments:
Post a Comment